The here are two vignettes in the Site Planing & Design exam – Site Design and Site Grading. Here we will cover what you should keep in mind for the Site Grading vignette.
For this vignette, you will need to grade the topography around a site element that you will place on the site.
This top 5 list for the Site Grading vignette will help prepare you for the Site Planing & Design division by keep you focused and organized. And don’t forget, as always you want to get as familiar with the NCARB software as possible!
5 Incredible Tips For the Site Grading Vignette
1. Follow the program. Repetition, repetition, repetition! Hopefully you’ve heard this tip enough by now you’ve come to expect it on these lists. That’s because it is important enough to include for each and every NCARB vignette. Follow the directions, be direct and efficient, and you should do well!
2. Respect the slope. After you place your site element, you will need to carefully re-grade the site so that water flows around this feature and down the site. Pay VERY close attention to the slope minimum and maximum numbers provided in the program. Make sure to practice with the formulas required to determine the spacing needed between contours so that you do not violate the slope requirements. This is the trickiest part of this vignette. If you can master it, the rest of the exam will be all down hill (no pun intended).
3. Protect existing site features. You will likely be given a site plan with trees, rocks, existing buildings, etc. that will need to remain undisturbed. This simply means don’t regrade the contours under these site features. Doing so to a tree would kill the tree and an existing building may become unstable and slide down the site. Avoid these site elements and focus on placing the new site element as far away from them as possible.
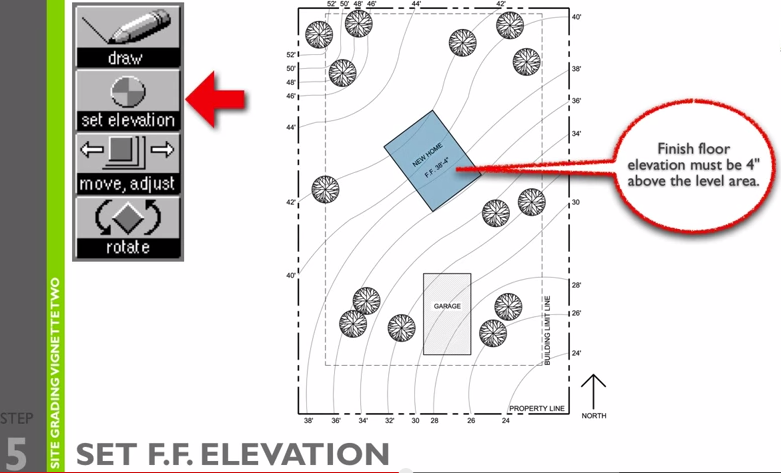
4. Locate the finish floor elevation. Once you place the new site element on the site plan, you will need to give it a finish floor elevation. This elevation should be higher than the contour you wrap around the element (this contour line would be the level ground area the element is built on). The program will give you the value for how high above the level area the new element needs to be. Follow this requirement – don’t go under or over.
5. Stay efficient. Only regrade the site to the level required in order to drain water around the new site element. There is no need to manipulate contour lines that will not assist your solution – in fact doing so could be considered inefficient and result in a down grade. Remember, you’re not “designing” the site, you’re grading it.
This vignette has several possible correct solutions, however all of them will meet the following criteria: the solution follows the program and is efficient. That’s it! Don’t worry about what the site looks like… in the end so long as you focus on these two items, you should do well. Think of the site as a problem to be solved, rather than a design to be created.
Keep focused, calm and organized and you should be successful with this vignette. Don’t forget to practice with the software and really get used to how to use it to your advantage. This vignette is one of the least intuitive in my opinion, but once you get the hang of it, it can become one of the simplest to solve.